Unit testing is a very important part of developing applications. After all, you really want to make sure your code is doing what it’s supposed to. With a unit test, you only want to test your own function code, not any other functions your function may call. This is where mocks come in. I know from experience that writing thorough unit tests with mocks can put you up to quite some challenges over time. That’s why I decided to write a blog series about the different challenges I faced when using mocks while unit testing my TypeScript code. Let’s start off with an introduction to nock.
One of the things your function can do is make a call to an HTTP(S) endpoint. To mock this call, you can use nock. In my example, the call runs through the AWS SDK, but the same holds true for direct calls. All of the code is written in Node.js.
Below is our function, in file example.ts.
import * as AWS from 'aws-sdk';

const documentClient = new AWS.DynamoDB.DocumentClient({ region: 'us-east-1' });

export async function getItemFromTable(itemKey: string) {
    const result: { code: number; body?: string; message?: string; detail?: string; } = { code: 0 };
    try {
        const getItemInput: AWS.DynamoDB.DocumentClient.GetItemInput = {
            TableName: 'my-table',
            Key: { itemKey }
        };

        const getItemResponse = await documentClient.get(getItemInput).promise();

        if (getItemResponse.Item) {
            result.code = 200;
            result.body = JSON.stringify(getItemResponse.Item);
        } else {
            result.code = 404;
            result.message = 'Not Found';
        }
    } catch (error) {
        result.code = 500;
        // I know this looks weird, but the AWSError datatype uses 'code' and 'message'
        result.message = error.code;
        result.detail = error.message;
    }
    return result;
}
We make a call to the DynamoDB DocumentClient from the AWS SDK on line 13. This is the call we’re going to mock in our unit test. First, make sure to run npm i nock so you can use nock.
import nock from 'nock';
import { getItemFromTable } from './example';

describe('getItemFromTable', () => {

    const ITEM_KEY = 'item1';
    afterEach(() => nock.cleanAll());

    it('UT001 - getItemFromTable with valid response', async() => {
        nock.recorder.rec();

        await getItemFromTable(ITEM_KEY);
    });
});
This is the beginning of our unit test. To see what your call looks like, you can use nock.recorder.rec(). Be aware, though, that this will turn off mocking, so the endpoint is actually receiving the call! afterEach(() => nock.cleanAll()) can be used to make sure all mocks are cleaned up after each test case.
When running this test, you’ll get the following in your logs (providing the table and item exist):
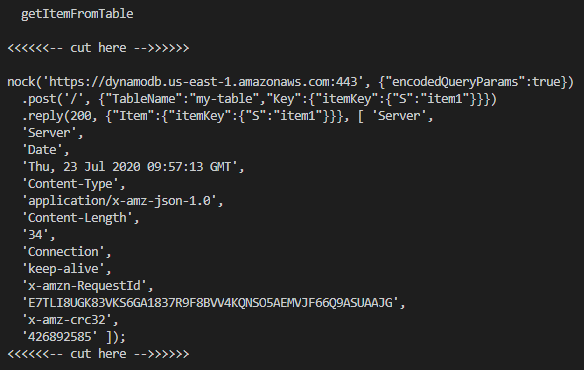
We can see here what the endpoint is, what it’s receiving, and what it’s returning. This is pretty nifty, as we now know exactly where to point our mock to, and also what response to return. Now we can edit our test and let nock take care of the call.
import nock from 'nock';
import { getItemFromTable } from './example';

describe('getItemFromTable', () => {

    const ITEM_KEY = 'getItemFromTableTest';
    afterEach(() => nock.cleanAll());

    it('UT001 - getItemFromTable with valid response', async() => {

        const getItemMockResponse: AWS.DynamoDB.DocumentClient.GetItemOutput = { Item: { itemKey: { S: ITEM_KEY } } };
        nock('https://dynamodb.us-east-1.amazonaws.com:443')
            .post('/')
            .reply(200, getItemMockResponse);

        await getItemFromTable(ITEM_KEY);
    });
});
You can put anything for the ITEM_KEY, since we’re talking to mocks instead of real data. On line 11, we define our mock response, which nock will return. We can use the logging from before to see what a response from DynamoDB looks like. After that, we define our nock mock, again using the information from our previous logging.
This seems to work, but our unit test is not actually testing anything yet. We’re going to add some expectations to check whether our response is as expected. I like to use the chai expect interface to write these, because it has a very readable syntax. Don’t forget to run npm i chai first!
import { expect } from 'chai';
import nock from 'nock';
import { getItemFromTable } from './example';

describe('getItemFromTable', () => {

    const ITEM_KEY = 'getItemFromTableTest';
    afterEach(() => nock.cleanAll());

    it('UT001 - getItemFromTable with valid response', async() => {

        const getItemMockResponse: AWS.DynamoDB.DocumentClient.GetItemOutput = { Item: { itemKey: { S: ITEM_KEY } } };
        nock('https://dynamodb.us-east-1.amazonaws.com:443')
            .post('/')
            .reply(200, getItemMockResponse);

        const response = await getItemFromTable(ITEM_KEY);

        expect(response.code).to.equal(200);
        expect(JSON.parse(response.body)).to.deep.equal({ itemKey: ITEM_KEY });
        expect(response.message).to.not.exist;
        expect(response.detail).to.not.exist;
    });
});
It’s also good practice to check whether your mock is actually being called. To do this, you can assign your nock to a variable, which will be of type nock.Scope. Then, you can call .isDone() on this variable, and add an expectation to see whether your call was redirected to nock correctly. Our test will then look like this:
import { expect } from 'chai';
import nock from 'nock';
import { getItemFromTable } from './example';

describe('getItemFromTable', () => {

    const ITEM_KEY = 'getItemFromTableTest';
    afterEach(() => nock.cleanAll());

    it('UT001 - getItemFromTable with valid response', async() => {

        const getItemMockResponse: AWS.DynamoDB.DocumentClient.GetItemOutput = { Item: { itemKey: { S: ITEM_KEY } } };
        const getItemRequestNock = nock('https://dynamodb.us-east-1.amazonaws.com:443')
            .post('/')
            .reply(200, getItemMockResponse);

        const response = await getItemFromTable(ITEM_KEY);

        expect(getItemRequestNock.isDone()).to.be.true;

        expect(response.code).to.equal(200);
        expect(response.message).to.not.exist;
        expect(response.detail).to.not.exist;
        expect(JSON.parse(response.body)).to.deep.equal({ itemKey: ITEM_KEY });
    });
});
So now we’ve learned the basics of using nock, easy right?! In my next blog, we’ll take a look at how to expand our test so we can check whether the request nock receives is as expected as well.