
When using the AWS CLI, you need your access key and secret key set up to talk to AWS. However, storing them on your disk is usually not what you want and using the same key in your install scripts over and over again also exposes some vulnerabilities. Luckily for us, AWS has an SSO feature that helps us prevent this and even better news is that it is included in the free tier.
Just type in SSO in the service bar and it should pop up:
If this is the first time you are using this service, you should see a big button saying ‘Enable AWS SSO’, so that is exactly what we are going to do. For this you already need to have set up Organizations in your account.
After simply pressing the button, you should be brought to a success page. On this page there is a quick overview and a link to the user portal, you have a one time option to change this user portal URL, I suggest you use it wisely.
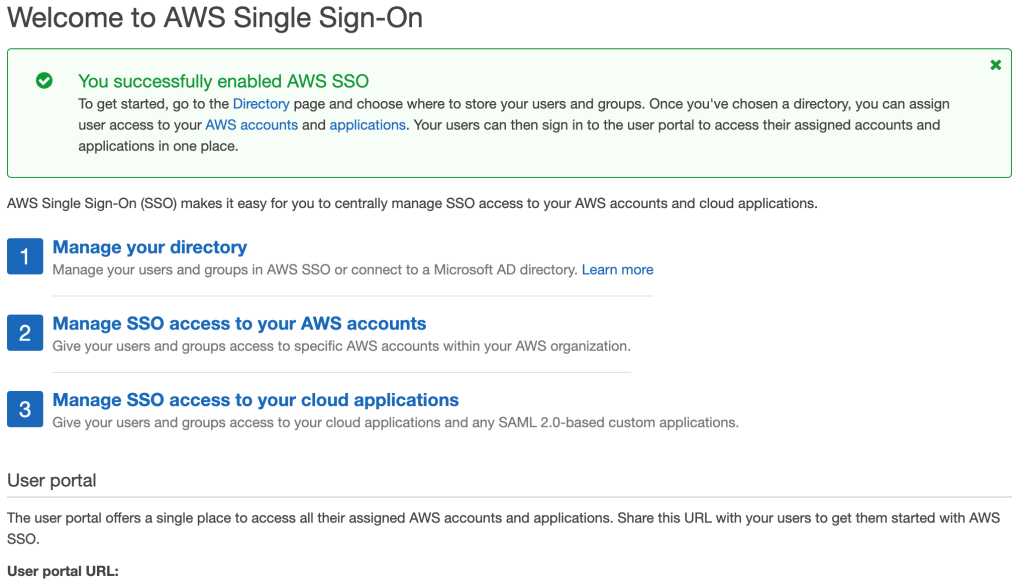
We go through these steps to configure a default setup to show one of the possible use cases for SSO.
In step one, after you click the ‘Manage your directory’-link, you can create users and groups. Clicking this link will bring you to a page where you can enter users and groups. There are different ways to look at this, in our example case we will use the users to control the access and forget about groups. In here I will create a new user for myself and we will leave the groups for what they are.
Now in the next step, ‘Manage the SSO access to your AWS accounts’, we can link this user to an existing IAM user. If you click this link, you will see your AWS organization with the accounts that are currently in there. You can select multiple accounts and click the ‘Assign User’ button, but in this case I will look up my own user and select that one. This will bring you to the permission sets.
In the permission sets overview, you can create a new permission set or you can leverage the default permission sets. Make sure you create and/or select at least one permission set, as you will need this. For this example I have selected the AdministratorAccess.
AWS will take a couple of seconds to configure your accounts and it will show a complete-message when ready.
Last but not least, if you want you can now start to add applications and use step 3 ‘Manage SSO access to your cloud applications’ to complete SSO configuration for this account.
Following the link and clicking the ‘Add a new application’ button will bring up the AWS SSO Application Catalog, but it will also provide a link to add a custom SAML 2.0 application. We will skip this step, as we do not need this.

For your SSO users, you can configure a couple of settings at the Settings tab. Here you can configure settings regarding MFA as well as delete the SSO configuration and start over if you like.
Do you remember the customisable URL from the start of this post? We will follow that URL. This will bring you to your own SSO start page, you should be asked to login and you can enter the user created in step 1. You should see Single Sign-On on the top bar to confirm you are where you want to be.

By default you should see your coupled AWS accounts in here. Prefixed with an id you should see your username and if you open the details, you should see the permission set. This SSO page should be the start of your AWS journey from now on. It has lots of benefits if you have multiple accounts coupled to your user, but even in this example case, it is already more secure.
When you open the menu, you should see two links; ‘Management console’ and ‘Command line or programmatic access’. The first one simply logs you in to the management console, but with a temporary user that assumed a role.
The second link opens a popup with CLI information. You can switch between a macOS/Linux CLI and Windows, after which you get an easy to copy export of your access key id, secret access key & session token.
These keys are valid for only 60 minutes (by default). This means that if you lose your key info (or someone sniffs it or gets access to it), they will expire, unlike the keys you can generate through the console.

With one click you can copy these lines and paste them into your terminal.
If you run an sts command to see the caller ID you will notice the account number and username. However, also notice this is an assumed role, just like in the console.

After simply waiting 61 minutes, the same call will fail and tell you the session token is expired. Making sure that if you lose your keys or someone gets a hold of them, they are only valid for a maximum period of an hour.
Resources:
– AWS Getting Started with SSO.
